This tutorial will give you some insights on how to do emulate ARM architecture using QEMU and the newly added virt machine. The intent of this article is to allow anyone willing to modify boot loaders and compile a custom kernel with a minimal shell environment.
Most information available on the internet is for the versatile_pb platform when emulating ARM with QEMU. However none of the following information is available yet regarding the virt machine.
Required Software
- Qemu, either compiled (for your distribution) or source code.
- U-boot
- Busybox
- Linux Kernel, use tag v5.0.5 to checkout code.
- ARM Cross Compiler toolchains
|
Package Name |
URL |
| QEMU | https://www.qemu.org/download/#source |
| U-Boot | http://git.denx.de/u-boot.git |
| Busybox | git://git.busybox.net/busybox |
| ARM Cross toolchain for compiling bare metal programs. i.e. Boot loader and Linux Kernel. | https://armkeil.blob.core.windows.net/developer/Files/downloads/gnu-rm/8-2018q4/gcc-arm-none-eabi-8-2018-q4-major-linux.tar.bz2 |
| ARM Cross toolchain for compiling application programs, i.e. those which require libc support. | https://armkeil.blob.core.windows.net/developer/Files/downloads/gnu-a/8.2-2019.01/gcc-arm-8.2-2019.01-x86_64-arm-linux-gnueabi.tar.xz |
| Linux Kernel | https://git.kernel.org/pub/scm/linux/kernel/git/stable/linux.git |
Setup Cross Toolchain
- Extract both the toolchains in separate directories. I’ll call them as none-eabi and linux-eabi.
- The none-eabi toolchain would be used to cross compile U-Boot and the Linux kernel.
- Add the path <extract_dir>/gcc-arm-none-eabi-8-2018-q4-major/bin/ to your PATH.
- Add the path <extract_dir>/gnueabi/gcc-arm-8.2-2019.01-x86_64-arm-linux-gnueabi/bin/ to your PATH.
- Now we’ve added both the cross tool chains in our path.
Compile U-Boot
U-Boot requires machine specific configurations so it can generate proper addresses. It also requires a DTS (Device tree source) file which would be compiled by the device tree compiler (dtc) to generate a device tree binary file (dtb).
In order to transfer control to U-Boot proper, we need to have both the U-Boot binary, machine specific DTB and SPL (Secondary Program Loader) to be present at specific location on the on-board flash according to the board chosen.
We’ll be choosing the qemu_arm emulation board for our purposes. Before you can compile U-Boot you’ll first need a configuration file to be generated. This is very similar to the Linux kernel compilation process.
ARCH=arm CROSS_COMPILE=arm-none-eabi- make defconfig
When the above process completes, you won’t be having a DTB file since virt is a special machine where the DTB file is generated by QEMU and placed at the start of RAM.
Compile Linux Kernel
Once a .config has been generated use the menuconfig target to change it. As it’s easier to turn on/off related components.
We would however need to have the following enabled and they should be in-built with the kernel
- A file system [ Choose this to be ext4 as it’s able to handle all previous versions as well ]
- Virtio block device and network devices. This is required since QEMU will show up our disk as a virtio block device to kernel and it’s required that guest os (our linux kernel) should’ve virtio block support.
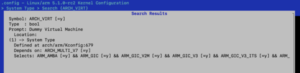
- Make sure you’ve Dummy Virtual Machine selected in System Type
ARCH=arm CROSS_COMPILE=arm-none-eabi- make menuconfig
ARCH=arm CROSS_COMPILE=arm-none-eabi- make zImage modules
Create a Raw Disk Image
The raw disk image we’ll create will
- Have GPT format instead of DOS/MBR.
- Have a single partition, but you can have as many as you like.
- Will be formatted using ext3 file system.
- Will have directories which are needed by kernel to boot properly.
Create a Holed Disk of 10G
dd if=/dev/zero of=~/sd-card.img bs=1 count=1 seek=10G
Next use the loop device and format this disk image
sudo losetup -f ~/sd-card.img
Using the losetup -l command check which loop device has been assigned your disk image. I’ll assume that it’s loop0 for further steps. The following steps
- sudo parted /dev/loop0
- mklabel gpt
- mkpart primary ext3 2MiB 98%
- set 1 boot on
- quit
- sudo losetup -d /dev/loop0
GPT format uses the end of disk to write an alternate entry in case the primary gets corrupted which is why we only use 98% of the disk. We also leave some space (2MiB) from the start of disk to allow for MBR style partitions to co-exist as well if required.
There’s a difference between 2MiB and 2MB. Former is in power of 2, while latter is in power of 10. We need the former not latter to properly align our disk areas.
Setting up the Boot Disk
Next we set the boot flag on for the primary partition to make it appear as a boot device. Though not required some boot loaders does require this.
Once this is done we’re ready to format the disk image. However the issue is that loop devices don’t show partitions directly. For this purpose we’ll use the kpartx utility. The following steps does that
Format the disk image
- sudo kpartx -a ~/sd-card.img
- sudo mkfs.ext3 /dev/mapper/loop0p1
The above disk image has now 1 partition formatted with ext3. Next install the zImage, kernel modules and BusyBox into this disk image. Note that we’ve not removed the above image yet from kpartx thus the below steps form upon the previous steps.
Copy zImage and Kernel Modules
- sudo mount /dev/mapper/loop0p1 /mnt
- sudo mkdir /mnt/boot
- sudo cp -fv arch/arm/boot/zImage /mnt/boot
- sudo make INSTALL_MOD_PATH=/mnt modules_install
Compile Busybox
To compile busybox, we’ll need to use the linux-gueabi toolchain since busy box is an application and would thus require kernel and libc support.
- ARCH=arm CROSS_COMPILE=arm-linux-gnueabi- make defconfig
- ARCH=arm CROSS_COMPILE=arm-linux-gnueabi- make
- ARCH=arm CROSS_COMPILE=arm-linux-gnueabi- make install
The install target will create a directory _install in the busybox directory. You’ll need to copy those files over to the disk image now
Copy Busybox binaries
sudo cp -frv _install/* /mnt/
Busy box requires some libc support, there are two ways to address this.
- Make the libc (cross compiled) available in the disk image.
- Statically link busybox binary with libc.
Important Note!
We’ll go with first option as it’s easier to do. The linux-gnueabi toolchain contains libc as well which is cross compiled from the same tool chain. This is very important! You can’t use a cross compiled libc with a different cross compiler and hope it would work.
So if you’re cross compiling gcc on your own, make sure you also compile libc with the same cross compiler or things just won’t work.
sudo cp -frv <extract_dir>/gnueabi/gcc-arm-8.2-2019.01-x86_64-arm-linux-gnueabi/arm-linux-gnueabi/libc /mnt
Create required directories for normal booting
sudo mkdir /mnt/sys
sudo mkdir /mnt/proc
sudo mkdir /mnt/dev
Unmount and remove the mappings for partitions.
- sudo umount /mnt
- sudo kpartx -d ~/sd-card.img
Booting
Move to the u-boot directory and boot using the following
qemu-system-arm -M virt -m 1G -drive if=virtio,file=/home/pranay/sd-card.img,format=raw -nographic -no-reboot -kernel u-boot
You should have a u-boot prompt after the above command, however we still need to boot into our kernel. For this purpose we’ll use a set of commands as shown below
|
Command |
Purpose |
|
setenv bootargs root=/dev/vda1 |
This command tells the kernel which device to use as root device to mount root file system. U-Boot can pass boot args to kernel as parameters using the bootargs environment variable. |
|
virtio scan |
This command scans the virtio bus for any virtio devices. Since we’ve added a virtio disk we call this command to make this disk available to u-boot. |
|
fdt addr $fdtcontroladdr |
There’s no DTB created for ARCH_VIRT when we compile kernel. QEMU creates a DTB and places it at this location. We use the fdt command to activate this FDT blob. |
|
fdt move $fdtcontroladdr $fdt_addr |
Move the blob to a new location, fdt_addr in this case. |
|
load virtio 0:1 $kernel_addr_r /boot/zImage |
Load the kernel zImage from virtio device 0 and partition 1 at kernel_addr_r in memory. |
|
bootz $kernel_addr_r – $fdt_addr |
Boot the kernel, this appears like a uImage with DTB appended at the end of it. |
You should drop to a shell, busybox init after the above command. Since kernel mounts the rootfs as Read-Only during the initialisation phase, you’ll have to remount the root directory as rw to be able to make changes.
mount -o remount rw /